There may be times when you want to run out the same report but with different parameters. For example, you may have a financial report that you want to run individually for three separate fiscal years. Typically, you would need to run out the report three times, once for each year.
Did you know that by making use of a batch file, you can automate this process? Furthermore, if you ever want to set up a scheduled task for your reports, you only have to set up one.
I’m going to show you how to do this using the example of a sales report that contains the information for three of my sales reps. I want to be able to run the report out on a monthly basis and share it with each of them. I also don’t want the data for them to be combined. Through the use of a batch file I’ll be able to execute the running of the report three times, once for each sales rep, through a single action, with the data filtered for each one.
1. In the Connector, I’m going the add a Pass Through Variable that I’ll use to store my sales rep name entered as a Parameter when the report is run. This isn’t necessary but will make identifying which sales rep a report is run for in step 4 easier.

2. Then in the Report Manager, I’m going to add the Parameter (making use of the Pass Through Variable) to capture the sale rep name.

3. I’m also going to add a filter, assigning my SalesPersonName field to my Pass Through Variable. This will filter the data in the report by the given sales rep at run time.

4. The next step is to set an Output File for the report through the advanced properties. This will save a copy of it to a Reports folder stored on my desktop when run. I’ve also included the ‘Date’ system variable and my sales rep Pass Through Variable in the name. This will allow me to identify the date the report is run on and the sales rep it was run for when saved to the folder.

Take note that if you don’t have access to the Connector module then you won’t be able to make use of a Pass Through Variable. You could then just use a Parameter to filter the required field in your report and make use of the ‘Time’ system variable in your Output File name to distinguish between the different report runs.
5. Following that I’m going to generate a Scheduler Command for the report by right clicking on it and selecting Generate Scheduler Command. This creates an executable command for the report that can be used by the Windows operating system.

6. I’m then asked to enter a default value for my Parameter that will be used by the Scheduler Command when it is executed. I’m going to enter one of my sales rep’s names. The particular one doesn’t matter.

7. After clicking okay the Scheduler Command is created and saved to my Windows clipboard. I can then click OK again.

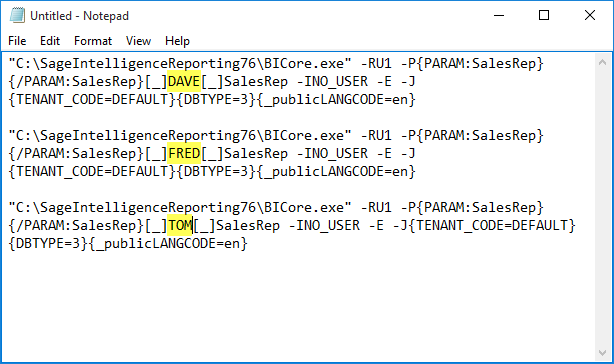
8. Following that I can create my batch file. Using the Windows Notepad application, after opening it, I can press Ctrl+V on my keyboard. This will place the Scheduler Command into it. I’m also going to copy it again in Notepad and paste it another two times.

9. You’ll see there’s a section which includes the Parameter for the report run and holds the value that will be used for it. At the moment this is ‘Dave’. I’m going to go ahead and edit the name in the second and third commands to hold the name of my other two reps. These are ‘Fred’ and ‘Tom’.
10. The last thing to do is save the file, which I’m going to do to my Reports folder. It’s important that you give it the extension ‘.bat’. There are other commands you can add to a batch file to make it more interactive or provide feedback as to when each command finishes executing. A quick google search can provide information on this but I’m not going to worry about this now.

Note that the file can be saved to any convenient location, it doesn’t have to be saved to the same folder that your reports will be saved to. I have just done this for convenience.
11. Now, if I open up my Reports folder I can see the batch file there and if I double click it, it will execute. A windows command window will appear detailing the execution of each command. And once each one completes, the produced report is saved to the folder, with the date and respective sales rep included in the name.

Normally, if you wanted to set up a scheduled task to complete this, you would need to create three separate tasks. Now, all you need to do is create a single task that executes the batch file. If you would like more information on creating scheduled tasks then take a look at the video here.
